DSC PNU 2기 iOS 세션 계획
부산대학교 - 지원하기 DSC Pusan National 멤버 지원하기 "대학 생활을 Google 개발자 프로그램과 함께!" sites.google.com 대상 : iOS 를 배우고 싶은 전공, 비전공학생들 조건 : 맥 필요 스터디원 아무도 없��
haningya.tistory.com
시작하기전
iOS 개발 경험 있는지 조사
Github 쓸줄 알고 풀리퀘스트 작성할 수 있는지 조사
Swift 쓸 줄 아는지 조사
1주차 - Xcode, iOS 기본
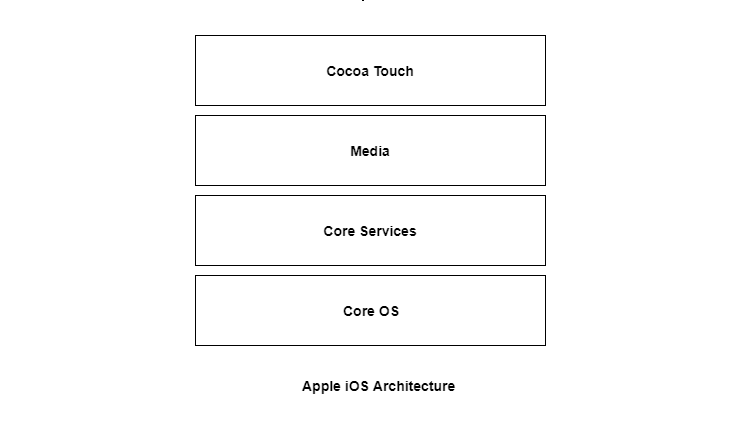
iOS의 특징, 안드로이드와의 비교
- The iOS architecture is layered. It contains an intermediate layer between the applications and the hardware so they do not communicate directly.
- The lower layers in iOS provide the basic services and the higher layers provide the user interface and sophisticated graphics.
- iOS 운영체제는 애플에 의해 만들어진 모바일 운영체제이다.
- 어플리케이션과 하드웨어 사이 중간 단계를 가진다.
- 하위 레이어는 기본적인 서비스를 제공하고 상위 레이어는 UI 와 복잡한 그래픽을 제공한다.
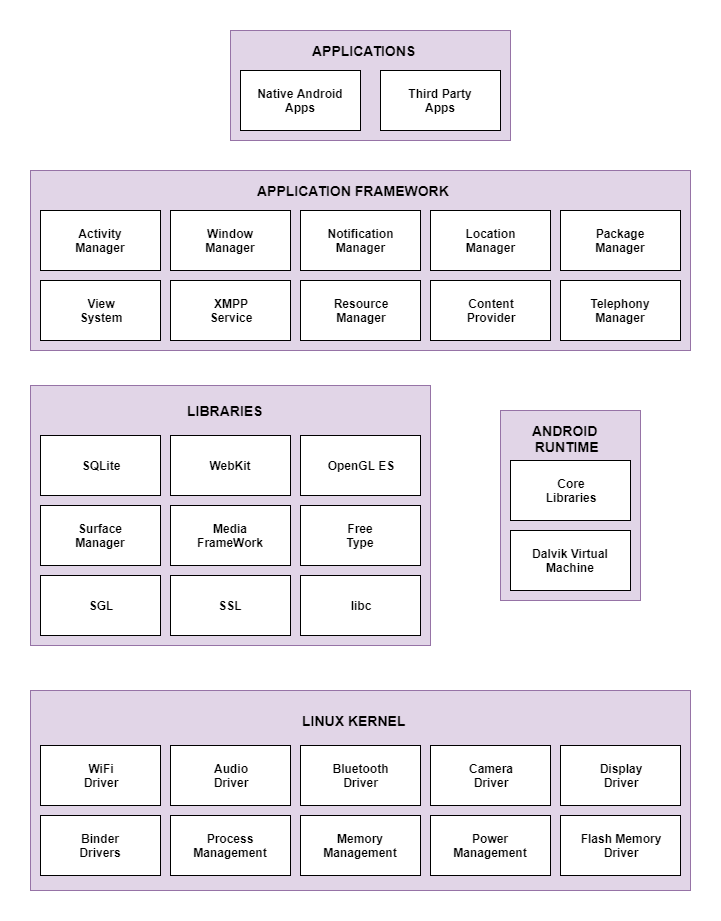
- Android is an operating system developed by Google for mobile systems.
- It is based on the Linux kernel and mainly designed for touchscreen devices such as tablets and smartphones.
- The Android architecture is divided into four main layers and five sections. This is explained using the given diagram:
- 안드로이드는 구글에 의해 개발된 모바일 운영체제 이다.
- 리눅스 커널을 기반으로 하고 터치 스크린을 탑제한 기기에서 사용되도록 만들어졌다.
- 안드로이드 아키텍쳐는 4개의 메인 레이어와 5개의 섹션으로 구성되 있다.
Similarities Between iOS and Android
Some of the similarities between iOS and Android are as follows:
- The basic functions in iOS and Android are alike. Both the iOS and Android phones have calling, messaging, web browsing, video chat, maps, voice commands etc.
- 전화나 메세지, 웹 브라우징, 지도 등등의 기본적인 기능들은 둘다 가지도 있다.
- The user interfaces of iOS and Android have a lot of similarities. Both of these support swiping, tapping, pinch and zoom etc on their phone screens.
- 스와이프, 터치, 두손가락 줌등 기본적인 유저 인터페이스가 비슷하다.
- There is a status bar on both the iOS and Android devices and it offers similar information such as battery life, time, app notifications, wifi etc.
- 둘다 상단에 상태바가 존재한다.
- Privacy settings are paramount in both iOS and Android. Users are presented with app permissions as this lessens the risk of data leakage.
- 개인정보에 관해 동의를 구하는 방식이 비슷하다.
Differences Between iOS and Android
Some of the differences between iOS and Android are as follows:
- iOS is a closed system whereas Android is more open. Users have barely any system permissions in iOS but in Android, users can customize their phones easily.
- iOS는 안드로이드보다 폐쇄적이다.
(iOS는 private API 를 통해 코드를 작성하면 리젝된다. 예를들어 action bottom sheet 에 이미지 삽입) - Android software is available for many manufacturers such as Samsung, LG etc. and this may lead to some quality problems in the cheaper phones. However, iOS is strictly controlled by Apple and there is no quality problem as there are few models.
- 안드로이드는 여러 하드웨어 제조사들이 있지만 iOS 는 Apple 만 하드웨어를 만들어 관리하기 편하다.
- The Android applications are obtained from Google Play while iOS applications are available in the Apple app store.
- 안드로이드앱은 구글 플레이스토어에서 다운받을 수 있고 iOS 는 앱스토어를 통해 다운받을 수 있다.
- The running speed of iOS devices remains consistent with time. In contrast to this, the performance of Android devices may decline over time.
- 안드로이드 디바이스는 시간이 지날수록 성능 저하가 나타난다.
- iOS has more strict rule for uploading new application than android
- iOS 앱의 심사가 더 까다롭고 규정도 많다.
- iOS use mostly Autolayout but android use xml code for making UserInterface
- iOS는 UI를 오토레이아웃을 사용하는데 안드로이드는 대부분 코드로 짠다.
iOS 개발 환경 세팅
DSC PNU #1 - iOS 세션 시작전 준비 (preparation before iOS Study)
Xcode 설치 // Install Xcode 용량이 꽤 커서 (7~8GB) 미리 설치를 해야 될 것 같습니다. 이미 설치하신 분들은 고대로 토욜 오전 10시에 뵙겠습니다. I think we should install xcode inadvacne of sesseion cau..
haningya.tistory.com
Xcode 프로젝트 생성
Create New Project를 누른다.
- Single View App : Window 의 root view controller 가 되는 하나의 view controller 를 만든다. 스토리보드 사용을 체크하면 스토리보드도 포함이 된다.
- Master-Detail App : 아이패드의 설정앱과 같은 템플릿을 제공한다. 만약 앱의 지원 디바이스를 Universial(iphone + ipad)로 한다면 기본 설정 앱과 같이 아이패드에서는 왼쪽 상위 리스트와 오른쪽 상세 화면이 한번에 제공되고 아이폰일 경우 뎁스를 만들어 상위리스트를 통해 상세화면을 볼 수 있도록 제공한다.
Single View App 프로젝트를 생성한다.
*Language : Swift
*User Interface : Storyboard
*나머지 체크 안함
- Use Core Data : ODB(On device database)의 일종. 안드로이드의 Room을 생각하면 된다.
- Include Unit Tests : 유닛 테스트를 위한 모듈을 포함시킨다
- Include UI Tests : UI test를 위한 모듈을 포함 시킨다.

- Version : 앱의 버전을 나타낸다.
- Build : 버전의 빌드 번호를 나타낸다. (정수값)
* 앱스토어 업로드시 빌드와 버전이 같게 올릴 수 없다.
만약 버전 1.0 빌드 1에서 버그가 발생해 수정후 업로드를 할때 버전1.0 빌드2로 해서 올리거나 버전1.xx 빌드1로 올리거나 해야한다.
- Device : 지원할 디바이스를 선택한다.
- Device Orientation : 화면 방향을 정해준다.
- Status bar style : 상태바에 대한 기본 설정을 할 수 있다.

Adding Capabilities to Your App | Apple Developer Documentation
Article Adding Capabilities to Your App Add capabilities to configure app services provided by Apple, such as push notifications, or Apple Pay. OverviewA capability grants your app access to an app service provided by Apple, such as CloudKit, Game Center,
developer.apple.com
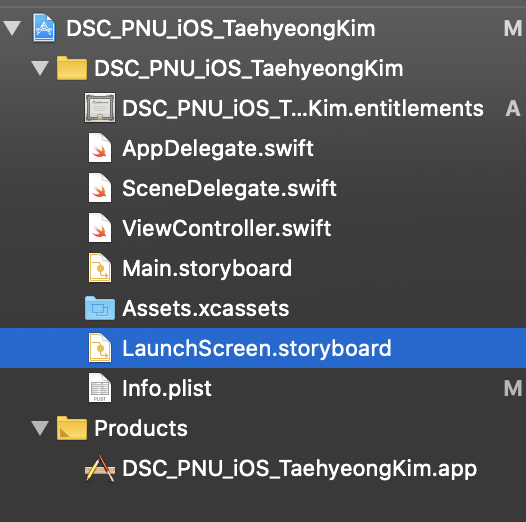
AppDelegate
Delegate 는 '대리자' 라는 뜻으로 AppDelegate는 App( Application ) 이 해야할 일을 대신 구현한다는 의미이다.
앱으로 Background 진입, Foreground 진입, 외부에서의 요청 (apns) 등을 처리하고 푸쉬메시지를 탭했을 때의 처리를 여기 작성한다.
import UIKit
import NaverThirdPartyLogin
import FBSDKCoreKit
import FBSDKLoginKit
import Firebase
import FirebaseMessaging
import UserNotifications

@UIApplicationMain
class AppDelegate: UIResponder, UIApplicationDelegate {

    func application(_ application: UIApplication, didFinishLaunchingWithOptions launchOptions: [UIApplication.LaunchOptionsKey: Any]?) -> Bool {
        // Override point for customization after application launch.

        //        Thread.sleep(forTimeInterval: 2)

        let instance = NaverThirdPartyLoginConnection.getSharedInstance()
        // 네이버 앱으로 인증하는 방식을 비활성화
        instance?.isNaverAppOauthEnable = true
        // SafariViewController에서 인증하는 방식을 활성화
        instance?.isInAppOauthEnable = true
        // 인증 화면을 iPhone의 세로 모드에서만 사용하기
        instance?.isOnlyPortraitSupportedInIphone()
        // 네이버 아이디로 로그인하기 설정
        // 애플리케이션을 등록할 때 입력한 URL Scheme
        instance?.serviceUrlScheme = kServiceAppUrlScheme
        // 애플리케이션 등록 후 발급받은 클라이언트 아이디
        instance?.consumerKey = kConsumerKey
        // 애플리케이션 등록 후 발급받은 클라이언트 시크릿
        instance?.consumerSecret = kConsumerSecret
        // 애플리케이션 이름
        instance?.appName = kServiceAppName

        ApplicationDelegate.shared.application(application, didFinishLaunchingWithOptions: launchOptions)

        //Firebase
        FirebaseApp.configure()
        Messaging.messaging().delegate = self
        UNUserNotificationCenter.current().delegate = self
        let authOptions: UNAuthorizationOptions = [.alert, .badge, .sound]
        UNUserNotificationCenter.current().requestAuthorization(options: authOptions,completionHandler: {_, _ in })
        application.registerForRemoteNotifications()

        return true
    }

    // MARK: UISceneSession Lifecycle

    func application(_ application: UIApplication, configurationForConnecting connectingSceneSession: UISceneSession, options: UIScene.ConnectionOptions) -> UISceneConfiguration {
        // Called when a new scene session is being created.
        // Use this method to select a configuration to create the new scene with.
        return UISceneConfiguration(name: "Default Configuration", sessionRole: connectingSceneSession.role)
    }

    func application(_ application: UIApplication, didDiscardSceneSessions sceneSessions: Set<UISceneSession>) {
        // Called when the user discards a scene session.
        // If any sessions were discarded while the application was not running, this will be called shortly after application:didFinishLaunchingWithOptions.
        // Use this method to release any resources that were specific to the discarded scenes, as they will not return.
    }

    func application(_ app: UIApplication, open url: URL, options: [UIApplication.OpenURLOptionsKey : Any] = [:]) -> Bool {
        if KOSession.isKakaoAccountLoginCallback(url.absoluteURL) {
            return KOSession.handleOpen(url)
        }
        NaverThirdPartyLoginConnection.getSharedInstance()?.application(app, open: url, options: options)
        return true
    }

    func application(_ application: UIApplication, open url: URL, sourceApplication: String?, annotation: Any) -> Bool {
        if KOSession.isKakaoAccountLoginCallback(url.absoluteURL) {
            return KOSession.handleOpen(url)
        }
        let handled = ApplicationDelegate.shared.application(application, open: url, sourceApplication: sourceApplication, annotation: annotation)

        return handled

        //        return ApplicationDelegate.shared.application(application,open: url,sourceApplication: sourceApplication,annotation: annotation)

    }
    func application(_ application: UIApplication, didRegisterForRemoteNotificationsWithDeviceToken deviceToken: Data) {
        Messaging.messaging().apnsToken = deviceToken
    }


}
extension AppDelegate: UNUserNotificationCenterDelegate {
    func userNotificationCenter(_ center: UNUserNotificationCenter, willPresent notification: UNNotification, withCompletionHandler completionHandler: @escaping (UNNotificationPresentationOptions) -> Void) {
        print("\(#function)")
        //foreground 에 있을 때 호출된다,
        completionHandler([UNNotificationPresentationOptions.alert,
                           UNNotificationPresentationOptions.sound,
                           UNNotificationPresentationOptions.badge])

    }
}
extension AppDelegate: MessagingDelegate {
    func messaging(_ messaging: Messaging, didReceiveRegistrationToken fcmToken: String) {
        print("Firebase registration token: \(fcmToken)")
        UserDefaults.standard.set(fcmToken, forKey: "fcmToken")
        let dataDict:[String: String] = ["token": fcmToken]
        NotificationCenter.default.post(name: Notification.Name("FCMToken"), object: nil, userInfo: dataDict)
    }
}
[자세한 설명은 여기로]
iOS ) AppDelegate.swift의 역할
프로젝트를 만들면..반드시..있는..파일....... 바로..AppDelegate.swift.... 문서를 하나 읽고있는데, 여기서 AppDelegate.swift에 대해서 잘 설명해주었더라구요 ㅎㅎ 저도 두리뭉실하게만 알고있었는데..:-)
zeddios.tistory.com
SceneDelegate
iOS13 부터 ipad의 멀티 스크린을 지원하기 위해 AppDelegate 의 window 개념을 Scene 개념으로 바꾼것.
하나의 앱에서 여러개의 scence을 가질 수 있다.
[iOS] AppDelegate와 SceneDelegate
Xcode에서 프로젝트를 생성하면 자동으로 AppDelegate.swift와 SceneDelegate.swift 파일이 추가되어 있어요! 오늘은 이 두 swift 파일에 있는 AppDelegate클래스와 SceneDelegate클래스에 대해서 알아보려고해요 😄
velog.io
ViewController
하나의 view 의 control 을 담당하는 역할. 여려개의 subview로 구성될 수 있음.
안드로이드로 치면 Fragment 나 Activity 의 자바파일
View Controllers | Apple Developer Documentation
You use view controllers to manage your UIKit app’s interface. A view controller manages a single root view, which may itself contain any number of subviews. User interactions with that view hierarchy are handled by your view controller, which coordinates
developer.apple.com
Main.Storyboard
view controller UI의 집합. 뷰 컨트롤러가 포함될 수 있다. 안드로이드로 치면 xml 파일들을 모은 디렉토리 느낌
(뷰컨트롤러 2개 만드는거 보여주기)
iOS 개발에서 스토리보드 란 무엇인가?
iOS 개발에서 스토리보드란 무엇인가? http://palmettowebdesign.com/blog/storyboards-app-development-ios-developers/ 스토리 보딩은 소프트웨어 디자인, 특히 iOS 앱 개발의 경우 매우 중요합니다. iOS 개발자..
hamait.tistory.com
Assets.xcassets
이미지와 같은 앱 리소스를 저장하는 폴더.
앱아이콘도 여기서 설정한다.
(제플린에서 export 하는 예시 보여주기)
LaunchScreen.storyboard
앱 시작할 때 몇 초간 뜨는 화면, 안드로이드로 치면 Splash Activity
info.plist
여러 앱의 설정들을 담은 파일. 각종 privacy permission을 구할때 나타나는 문자같은걸 정의할 수 있다.

Label 에 "Hello World" 띄워서 에뮬레이터 실행하기
- command + shift + L
- label 선택 + 정 중앙 위치
- hello world 라벨에 직접 타이핑
- command + b : 빌드
- comand + r : 실행
- view controller 에 연결해서 swift code 로 Hello world 입력
Autolayout 이란
AutoLayout은 뷰에 주어진 제약조건에 따라 뷰의 크기와 위치를 동적으로 계산해 배치하는 것으로 외부 또는 내부의 변화에 동적으로 반응하여 유저 인터페이스 구성한다.
[iOS] 오토레이아웃(AutoLayout)과 Layout 개념 - jinShine
AutoLayout Autolayout의 개념들에 관해 알아 보겠습니다. AutoLayout은 뷰에 주어진 제약조건에 따라 뷰의 크기와 위치를 동적으로 계산해 배치하느것으로, 외부 또는 내부의 변화에 동적으로 반응하여
jinshine.github.io
짜잔 방금 쓴게 AutoLayout 입니다.
디바이스 별로 화면 볼수 있는거 보여주기
Autolayout 사용법 익히기
로그인 화면 만들기
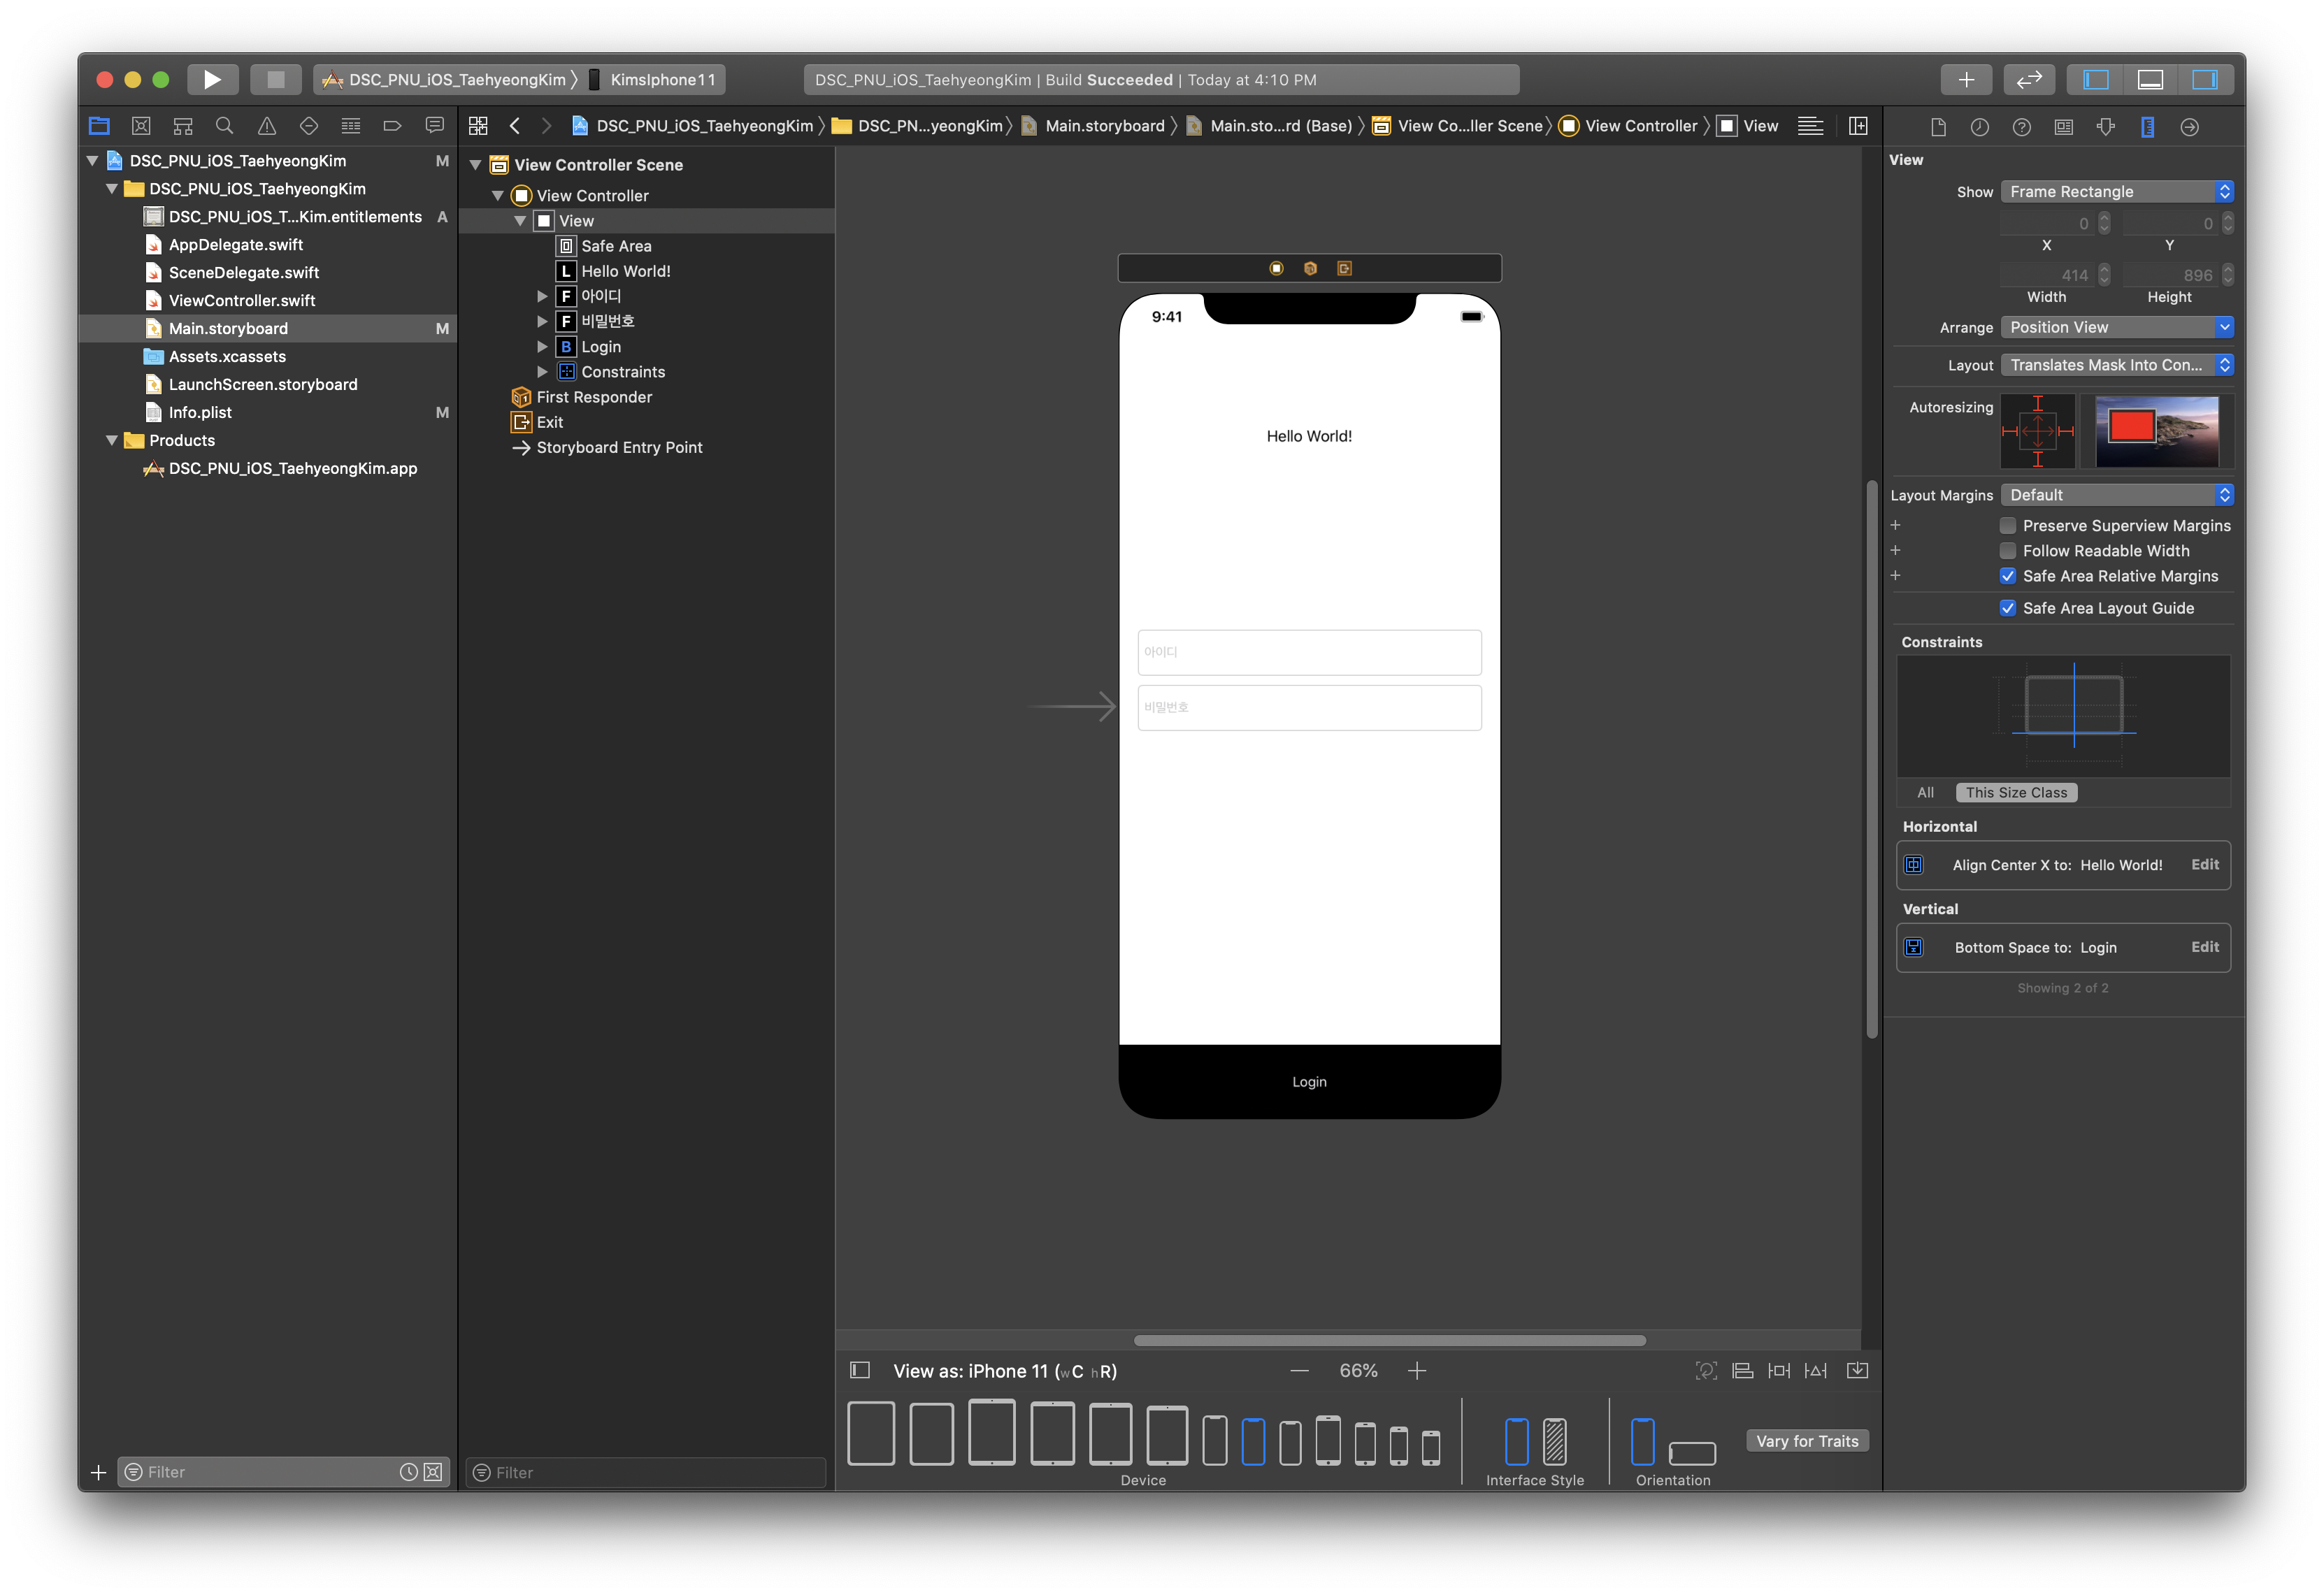
xcode 오른쪽 탭에서도 constraint 를 수정할 수 있는것 언급하기
- UILabel
- UITextField
- UIButton
으로 구성
코드로 constraint 주는 방법
View.translatesAutoresizingMaskIntoConstraints = false
        self.titleView.addSubview(View)
        searchView.leadingAnchor.constraint(equalTo: self.titleView.leadingAnchor).isActive = true
        searchView.trailingAnchor.constraint(equalTo: self.titleView.trailingAnchor).isActive = true
        searchView.topAnchor.constraint(equalTo: self.titleView.topAnchor).isActive = true
        searchView.bottomAnchor.constraint(equalTo: self.titleView.bottomAnchor).isActive = true
Assistant 사용법 // 왜 Assistant가 열리는지 스토리보드에 View controller 매핑 방법
빈 UIVIew 를 뷰컨 상단바에 위치 시키고 버튼 누를 때 hidden 처리 하고 보이게 하는 거 보여주기(배경색으로 구분되게)
*IbOutlet 삭제할때 주의점 (스토리보드에 남아있는 현상)
iOS ) translatesAutoresizingMaskIntoConstraints
안녕하세요 :) Zedd입니다. 오늘은...! translatesAutoresizingMaskIntoConstraints..!을 정확히 알아보는 공부~.~ translatesAutoresizingMaskIntoConstraints 사실 엄청 많이 보셨을 코드에요. self.view.transl..
zeddios.tistory.com
화면 전환 방법 : Segue
- 새로운 뷰컨트롤러 만들어서 스토리보드 매핑
- navigation controller embed 방법
push
다른 스토리 보드에 있을 때
  let storyboard = UIStoryboard(name: "Order", bundle: nil)
        let vc = storyboard.instantiateViewController(withIdentifier: "OrderVC") as! OrderVC
        self.navigationController?.pushViewController(vc, animated: true)
같은 스토리 보드에 있을 때
navigationController?.pushViewController(vc!, animated: true)
modal
 let vc = storyboard?.instantiateViewController(withIdentifier: "StoreLocationMapVC") as? ViewController

              //        navigationController?.pushViewController(vc!, animated: true)
            vc?.modalPresentationStyle = .overFullScreen

              present(vc!, animated: true) {
                  //action
              }
Modal presentation Style
https://magi82.github.io/ios-modal-presentation-style-01/
iOS UIModalPresentationStyle 알아보기(currentContext, FullScreen) - 01 – 마기의 개발 블로그 – 즐겁게 개발을 하고 싶은 욕심 많은 개발자
안녕하세요. 마기입니다. 오래간만에 포스팅을 하는거 같습니다. 이번에는 UIModalPresentationStyle 에 대해서 알아보고자 합니다. 다양한 스타일이 있는 만큼 나눠서 포스팅할 예정 입니다. 이번 포스팅에서는 아래 4가지 스타일에 대해서 알아보도록 하죠! fullScreen currentContext overFullScreen overCurrentContext UIModalPresentationStyle 각각 스타일을 알아보기전에 UIModa
magi82.github.io
Tabbar controller
'iOS > DSC Study Session' 카테고리의 다른 글
| DSC PNU #4 - 4주차 iOS 세션 노트 (0) | 2020.05.29 |
|---|---|
| DSC PNU #3 - 3주차 iOS 세션 노트 (0) | 2020.05.22 |
| DSC PNU #2 - 2주차 iOS 세션 노트 (0) | 2020.05.14 |
| DSC PNU #1 - iOS 세션 시작전 준비 (preparation before iOS Study) (2) | 2020.05.07 |
| DSC PNU 2기 iOS 세션 계획 (2) | 2020.04.10 |


댓글