
DSC PNU 2기 iOS 세션 계획
부산대학교 - 지원하기 DSC Pusan National 멤버 지원하기 "대학 생활을 Google 개발자 프로그램과 함께!" sites.google.com 대상 : iOS 를 배우고 싶은 전공, 비전공학생들 조건 : 맥 필요 스터디원 아무도 없��
haningya.tistory.com
DSC PNU #1 - iOS 세션 시작전 준비 (preparation before iOS Study)
Xcode 설치 // Install Xcode 용량이 꽤 커서 (7~8GB) 미리 설치를 해야 될 것 같습니다. 이미 설치하신 분들은 고대로 토욜 오전 10시에 뵙겠습니다. I think we should install xcode inadvacne of sesseion cau..
haningya.tistory.com
DSC PNU #1 - 1주차 iOS 세션 노트
DSC PNU 2기 iOS 세션 계획 부산대학교 - 지원하기 DSC Pusan National 멤버 지원하기 "대학 생활을 Google 개발자 프로그램과 함께!" sites.google.com 대상 : iOS 를 배우고 싶은 전공, 비전공학생들 조건 : 맥..
haningya.tistory.com
DSC PNU #2 - 2주차 iOS 세션 노트
DSC PNU #1 - 1주차 iOS 세션 노트 DSC PNU 2기 iOS 세션 계획 부산대학교 - 지원하기 DSC Pusan National 멤버 지원하기 "대학 생활을 Google 개발자 프로그램과 함께!" sites.google.com 대상 : iOS 를 배우고..
haningya.tistory.com
이전까지 배운 내용
- 개발환경 세팅
- iOS 운영체제 특징
- Xcode 프로젝트 종류 및 생성 방법
- Xcode Single View app 프로젝트 기본 구성 파일
- info.plist
- Autolayout
- Hello world 앱
- 코드로 constraint 주는법
- 화면 전환 방법 : push, present
- iOS 아키텍쳐 패턴
- UITableView 사용법
3주차 - iOS lifecycle , 기본 Widget들 사용해 보기
iOS View Controller 생명 주기
- application은 여러 view controller 로 이루어져 있다.
- 각각의 화면을 담당하는 view controller가 존재한다.
- 각각의 view controller 는 life cycle 을 가지고 있다.
- 여기서 말하는 생명주기란 화면에 보여졌다가 사라지는 주기이다

- 스크린에 View Controller 가 호출되면
- View 가 처음 만들어지는 경우(없을 경우)
loadView --> viewDidLoad --> viewWillAppear --> viewDidAppear --> 화면 표시 - View 가 기존에 있을 경우 :
viewWillAppear --> ViewDidAppear --> 화면 표시
- View 가 처음 만들어지는 경우(없을 경우)
- 화면 표시 후 가용 메모리가 적을 경우
- didReceiveMemoryWarning
- 스크린에서 View Controller 를 없앨 경우
- viewWillDisappear --> viewDidDisappear
viewDidLoad()
- 뷰의 컨트롤러가 메모리에 로드 된 뒤 호출된다.
- 뷰의 로딩이 완료 되었을 때 시스템에 의해 자동으로 호출된다.
- 리소스를 초기화 하거나 초기 화면을 구성하는 용도로 쓰인다.
- 화면이 만들어 질때 처음 한번만 실행된다.
viewDidLoad() - UIViewController | Apple Developer Documentation
Instance Method viewDidLoad() Called after the controller's view is loaded into memory. DeclarationDiscussionThis method is called after the view controller has loaded its view hierarchy into memory. This method is called regardless of whether the view
developer.apple.com
viewWillAppear()
- ViewDidLoad() 가 처음 한번 호출되는 부분이라면 viewWillAppear는 뷰가 화면에 나타날 때 마다 호출된다.
- View A와 B가 있고 둘 은 navigation Controller 로 embed 되있다고 생각해보면
- 처음 A가 화면에 나타날 때 : A viewDidLoad --> A viewWillAppear
- A에서 B 화면 push 했을 때 B viewDidLoad --> B viewDidAppear
- A에 push 된 B를 pop 했을 때 : B viewDidDisappear --> A ViewWillApear
- push 된 controller에서 데이터 변경이 일어난 뒤 pop 했을 때 rootView의 데이터가 refresh 되어야 할때 viewWillAppear에 코드를 작성하면 된다.
viewWillAppear(_:) - UIViewController | Apple Developer Documentation
Instance Method viewWillAppear(_:) Notifies the view controller that its view is about to be added to a view hierarchy. Declarationfunc viewWillAppear(_ animated: Bool) ParametersanimatedIf true, the view is being added to the window using an animation.Dis
developer.apple.com
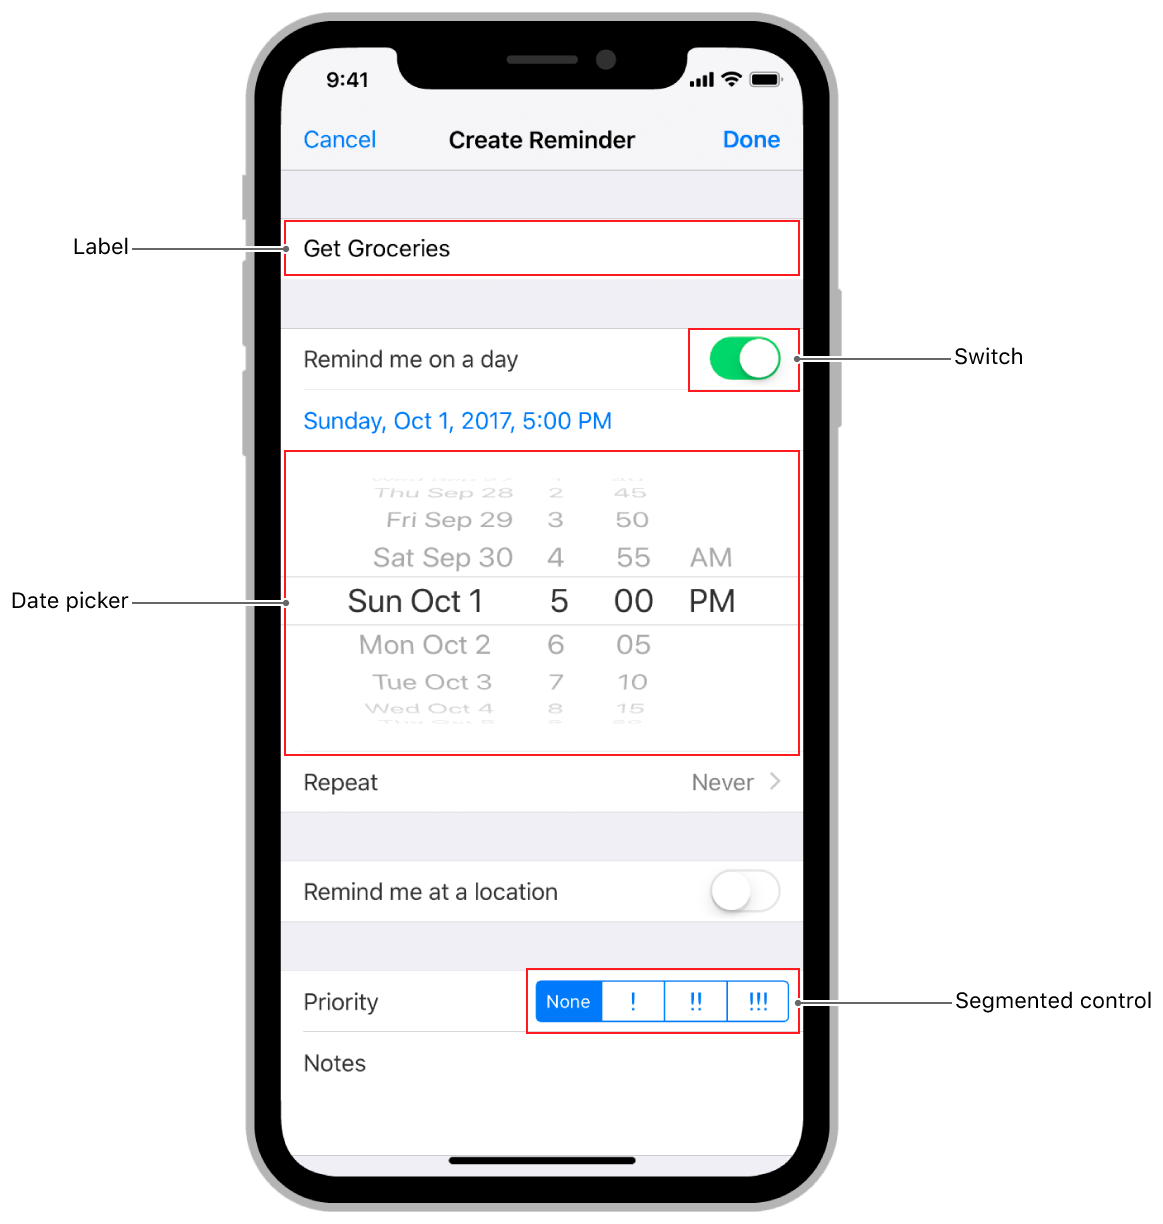
- Label
- Button
- Segmented Control
- text field
- slider
- switch
- activity indicator
- page control
- stepper
- UIAlertViewController
- Alert
- Action Sheet
- with text field
UILabel
UILabel - UIKit | Apple Developer Documentation
Label displaying an attributed string, with overridden text color
developer.apple.com

AttributedText
// create attributed string
let myString = "Swift Attributed String"
let myAttribute = [ NSAttributedString.Key.foregroundColor: UIColor.blue ]
let myAttrString = NSAttributedString(string: myString, attributes: myAttribute)

// set attributed text on a UILabel
myLabel.attributedText = myAttrString
let myAttribute = [ NSAttributedString.Key.foregroundColor: UIColor.blue ]

let myAttribute = [ NSAttributedString.Key.backgroundColor: UIColor.yellow ]

let myAttribute = [ NSAttributedString.Key.font: UIFont(name: "Chalkduster", size: 18.0)! ]

let myAttribute = [ NSAttributedString.Key.underlineStyle: NSUnderlineStyle.single.rawValue ]

let myShadow = NSShadow()
myShadow.shadowBlurRadius = 3
myShadow.shadowOffset = CGSize(width: 3, height: 3)
myShadow.shadowColor = UIColor.gray

let myAttribute = [ NSAttributedString.Key.shadow: myShadow ]
- 여러 Attribute 적용
      let labelText = lbFriend.text
        let strokeTextAttributes = [
            NSAttributedString.Key.strokeColor : UIColor.black,
            NSAttributedString.Key.foregroundColor : UIColor.white,
            NSAttributedString.Key.strokeWidth : -2.0,
            NSAttributedString.Key.font : UIFont.boldSystemFont(ofSize: 18),
            ] as [NSAttributedString.Key : Any]

        lbFriend.attributedText = NSAttributedString(string: labelText!, attributes: strokeTextAttributes)
- Attributed String 을 수정하고 싶을 때
textView.attributedText = myString
How do I make an attributed string using Swift?
I am trying to make a simple Coffee Calculator. I need to display the amount of coffee in grams. The "g" symbol for grams needs to be attached to my UILabel that I am using to display the amount. The
stackoverflow.com
UIButton
UIButton - UIKit | Apple Developer Documentation
When you tap a button, or select a button that has focus, the button performs any actions attached to it. You communicate the purpose of a button using a text label, an image, or both. The appearance of buttons is configurable, so you can tint buttons or f
developer.apple.com
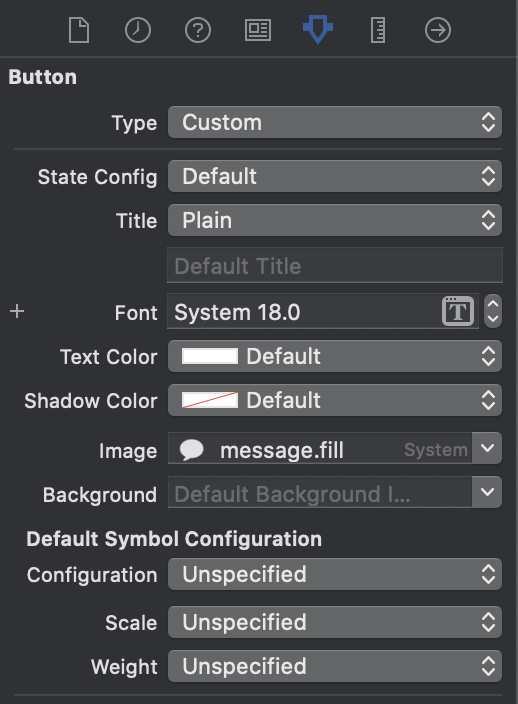
- Type : 미리 정의된 iOS 버튼 사용할 때 바꿈
- State Config : Highlighted, Selected, Disabled
- Title : Attributed, Plain
- Image : 텍스트와 이미지를 함께 사용할 때. (이미지)(텍스트) 로 배치됨
- Background : 버튼 배경으로 title 뒤에 이미지가 배치됨
UITextField - UIKit | Apple Developer Documentation
Notifies observers that the editing session ended for a text field. The affected text field is stored in the object parameter of the notification. The userInfo dictionary is not used.
developer.apple.com


UISegmentedControl
Segmented Controls - Controls - iOS - Human Interface Guidelines - Apple Developer
Segmented Controls A segmented control is a linear set of two or more segments, each of which functions as a mutually exclusive button. Within the control, all segments are equal in width. Like buttons, segments can contain text or images. Segmented contro
developer.apple.com
UISegmentedControl - UIKit | Apple Developer Documentation
A control that displays a horizontal series of dots, each of which corresponds to a page in the app’s document or other data-model entity.
developer.apple.com

UIAlertController - UIKit | Apple Developer Documentation
Use this class to configure alerts and action sheets with the message that you want to display and the actions from which to choose. After configuring the alert controller with the actions and style you want, present it using the present(_:animated:complet
developer.apple.com
UISlider
UISlider - UIKit | Apple Developer Documentation
A control that displays a horizontal series of dots, each of which corresponds to a page in the app’s document or other data-model entity.
developer.apple.com

UISwitch
UISwitch - UIKit | Apple Developer Documentation
A control that displays a horizontal series of dots, each of which corresponds to a page in the app’s document or other data-model entity.
developer.apple.com

UIStepper
UIStepper - UIKit | Apple Developer Documentation
If you set stepper behavior to “autorepeat” (which is the default), pressing and holding one of its buttons increments or decrements the stepper’s value repeatedly. The rate of change depends on how long the user continues pressing the control. The m
developer.apple.com

UIActivityViewController
activityIndicator | Apple Developer Documentation
Associates information in a data item with an element.
developer.apple.com

UIPageControl
UIPageControl - UIKit | Apple Developer Documentation
A control that displays a horizontal series of dots, each of which corresponds to a page in the app’s document or other data-model entity.
developer.apple.com

실습 1 UITextField
코드로 View 추가
popupView.translatesAutoresizingMaskIntoConstraints = false
self.view.addSubview(popupView)
popupView.leadingAnchor.constraint(equalTo: self.view.leadingAnchor).isActive = true
popupView.trailingAnchor.constraint(equalTo: self.view.trailingAnchor).isActive = true
popupView.topAnchor.constraint(equalTo: self.view.safeAreaLayoutGuide.topAnchor).isActive = true
popupView.heightAnchor.constraint(equalToConstant: 200).isActive = true
popupView.isHidden = true
Border 추가
extension CALayer {
    //전에 layout if needed 해야함
    func addBorder(_ arr_edge: [UIRectEdge], color: UIColor, width: CGFloat) {
        for edge in arr_edge {
            let border = CALayer()
            switch edge {
            case UIRectEdge.top:
                border.frame = CGRect.init(x: 0, y: 0, width: frame.width, height: width)
                break
            case UIRectEdge.bottom:
                border.frame = CGRect.init(x: 0, y: frame.height - width, width: frame.width, height: width)
                break
            case UIRectEdge.left:
                border.frame = CGRect.init(x: 0, y: 0, width: width, height: frame.height)
                break
            case UIRectEdge.right:
                border.frame = CGRect.init(x: frame.width - width, y: 0, width: width, height: frame.height)
                break
            default:
                break
            }
            border.backgroundColor = color.cgColor;
            self.addSublayer(border)
        }
    }
}
실습 2 Segmented Control

@IBAction func segChangedAction(_ sender: UISegmentedControl) {
        switch sender.selectedSegmentIndex {
        case 0:
            view1.isHidden = false
            view2.isHidden = true

        case 1:
            view1.isHidden = true
            view2.isHidden = false

        default:
            break;
        }
    }
let alert = UIAlertController(title: "유의사항", message: "도착 예정시간에 맞춰 음식을 준비하므로 \n\"꼭\" 늦지않게 주의해주세요. \n※ 매장측에서 주문 접수가 시작되면 \n환불이 불가합니다." , preferredStyle: .actionSheet)
let OKAction = UIAlertAction(title: "확인", style: UIAlertAction.Style.default, handler: {
                (_)in
                self.reservate()
            })
let cancelAction = UIAlertAction(title: "취소", style: UIAlertAction.Style.default, handler: {
                (_)in
                self.dismiss(animated: true, completion: nil)
            })
let thirdAction = UIAlertAction(title: "확인(다시보지않기)", style: UIAlertAction.Style.default, handler: {
                (_)in
                UserDefaults.standard.set(true, forKey: "agree")
                self.reservate()

            })
alert.addAction(OKAction)
alert.addAction(thirdAction)
alert.addAction(cancelAction)

self.present(alert, animated: true, completion: nil)
//
//  MyProfileVC.swift
//  week2-practice
//
//  Created by TaeHyeong Kim on 2020/05/22.
//  Copyright © 2020 김태형. All rights reserved.
//

import UIKit

class MyProfileVC: UIViewController {

    @IBOutlet weak var lbSwitch: UILabel!

    @IBOutlet weak var slider: UISlider!


    override func viewDidLoad() {
        super.viewDidLoad()

        // Do any additional setup after loading the view.
    }

    @IBAction func actionSwitch(_ sender: UISwitch) {
        if sender.isOn{
            lbSwitch.text = "스위치 켜짐"
        }else{
            lbSwitch.text = "스위치 꺼짐"
        }
    }

    @IBAction func actionSlider(_ sender: UISlider) {
        lbSwitch.text = "슬라이더 값 \(sender.value)"
    }

    @IBAction func actionStepper(_ sender: UIStepper) {
        lbSwitch.text = "stepper \(sender.value)"
    }

    @IBAction func actionActivityIndicator(_ sender: Any) {
        self.startActivityIndicator()
    }
    @IBAction func actionActivityStop(_ sender: Any) {
        self.stopActivityIndicator()
    }
}
extension UIViewController {
    var activityIndicatorTag: Int { return 999999 }
    var loadingTag: Int{return 1234321}
}
extension UIViewController {
    func startActivityIndicator(style: UIActivityIndicatorView.Style = .large, location: CGPoint? = nil) {
        //Set the position - defaults to `center` if no`location`
        //argument is provided
        let loc = location ?? self.view.center
        //Ensure the UI is updated from the main thread
        //in case this method is called from a closure
        DispatchQueue.main.async {
//            //Create the activity indicator
            let activityIndicator = UIActivityIndicatorView(style: style)
            //Add the tag so we can find the view in order to remove it later

            activityIndicator.tag = self.activityIndicatorTag
            //Set the location

            activityIndicator.center = loc
            activityIndicator.hidesWhenStopped = true
            //Start animating and add the view

            activityIndicator.startAnimating()
            self.view.addSubview(activityIndicator)


//            let imageView = UIImageView(image: UIImage(named: "new_ic_loading"))
//            let animation = CABasicAnimation(keyPath: "transform.rotation")
//            animation.fromValue = 0
//            animation.toValue =  Double.pi * 2.0
//            animation.duration = 1.5
//            animation.repeatCount = .infinity
//            animation.isRemovedOnCompletion = false
//
//            imageView.layer.add(animation, forKey: "spin")
//            imageView.tag = self.loadingTag
//            imageView.center = loc
//            self.view.addSubview(imageView)

        }
    }

    func stopActivityIndicator() {
        //Again, we need to ensure the UI is updated from the main thread!
        DispatchQueue.main.async {
//            Here we find the `UIActivityIndicatorView` and remove it from the view
            if let activityIndicator = self.view.subviews.filter(
                { $0.tag == self.activityIndicatorTag}).first as? UIActivityIndicatorView {
                activityIndicator.stopAnimating()
                activityIndicator.removeFromSuperview()
            }


//            if let loadingIndicator = self.view.subviews.filter(
//                { $0.tag == self.loadingTag}).first as? UIImageView {
//                loadingIndicator.stopAnimating()
//                loadingIndicator.removeFromSuperview()
//            }


        }
    }
}
func setUpStoreImage() {
        let images = [
                    "Image",
                    "ic_background_login",
                    "Image",
                    "ic_background_login"]
        pageControl.layoutIfNeeded()
        pageControl.numberOfPages = images.count
        for i in 0..<images.count{
            let imageView = UIImageView()
            imageView.image = UIImage(named: images[i])
            imageView.contentMode = .scaleAspectFill //  사진의 비율을 맞춤.
            imageView.clipsToBounds = true
            let xPosition = self.view.frame.width * CGFloat(i)

            imageView.frame = CGRect(x: xPosition, y: 0,
                                     width: self.horizontalScrollView.frame.width,
                                     height: self.horizontalScrollView.frame.height) // 즉 이미지 뷰가 화면 전체를 덮게 됨.
            horizontalScrollView.contentSize.width =
                self.view.frame.width * CGFloat(1+i)
            horizontalScrollView.addSubview(imageView)
            imageView.layoutIfNeeded()
        }
    }
extension MyProfileVC : UIScrollViewDelegate{
func scrollViewDidScroll(_ scrollView: UIScrollView) {
pageControl.currentPage = Int(floor(scrollView.contentOffset.x / UIScreen.main.bounds.width))
}
}
'iOS > DSC Study Session' 카테고리의 다른 글
| DSC 모집합니다. (0) | 2020.09.04 |
|---|---|
| DSC PNU #4 - 4주차 iOS 세션 노트 (0) | 2020.05.29 |
| DSC PNU #2 - 2주차 iOS 세션 노트 (0) | 2020.05.14 |
| DSC PNU #1 - 1주차 iOS 세션 노트 (0) | 2020.05.08 |
| DSC PNU #1 - iOS 세션 시작전 준비 (preparation before iOS Study) (2) | 2020.05.07 |


댓글