
이전 포스팅
🎥 iOS 비디오 재생, 녹화, 병합 튜토리얼 (2)
이전 포스팅 🎥 iOS 비디오 재생, 녹화, 병합 튜토리얼 (1) [출처] How to Play, Record and Merge Videos in iOS and Swift Learn the basics of working with videos on iOS with AV Foundation in this tutori..
haningya.tistory.com
참고자료
AVFoundation Tutorial: Adding Overlays and Animations to Videos
In this AVFoundation tutorial, you’ll learn how to add overlays and animations to videos, by using the AVVideoComposition CoreAnimationTool, which allows you to combine CALayers with videos to add backgrounds and overlays.
www.raywenderlich.com
이전까지 한 것
- 비디오 앨범에서 선택후 재생
- 비디오 촬영 후 앨범 저장 및 재생
- 비디오 두개와 오디오 하나 합쳐서 저장 후 재생
오늘 목표
- 비디오에 custom border 추가
- 비디오에 텍스트와 이미지 추가
- 비디오 오버레이를 animate
- 오버레이된 완성된 비디오를 export
새로운 VC에서 작업하겠다.
원래 있던 VC 에 새로운 VC 로 이동할 수 있는 버튼과 코드 작성해준다.
    @IBAction func actionPresentBirthdayVC(_ sender: Any) {
        let storyboard = UIStoryboard(name: "Main", bundle: nil)
        let vc = storyboard.instantiateViewController(identifier: "MakeBirthdayCardVC") as? MakeBirthdayCardVC
        self.navigationController?.pushViewController(vc!, animated: true)
    }
원래 VC 에도 NavigationController Embed 해준다.
Overlay를 비디오에 추가 하기전 비디오를 들고오거나 새로 찍어야 한다.
그리고 해당 비디오에 배경과 overlay들을 추가해보겠다.
[할일]
- 새로운 AVFoundation Composition을 생성한다.
(Composition은 일종의 프로그래밍 가능한 video editor 라고 생각하면 된다.) - Composition은 여러 타입의 track 을 가질 수 있다.
(audio, video, 부터 해당 트랙의 start, end, time line 등등) - 빈 composition을 생성 한 뒤 두개의 track을 composition에 추가할 것 이다.
(하나는 비디오, 하나는 오디오) - 오디오 트랙의 경우 그냥 원본 비디오의 오디오를 사용할 것이다.
- 비디오를 만들기 위해서는 AVVideoCompositionCoreAnimationTool 클래스를 사용할 것이다.
(해당 클래스는 기존의 비디오와 Core Animation Layer를 합칠 수 있게 해준다.) - 비디오와 오디오를 composition 내에서 합친 구 AVAssetExportSession을 사용하여 하나의 파일로 export 할 것이다.
Composing a Video
let asset = AVURLAsset(url: videoURL)
let composition = AVMutableComposition()- 이전 튜토리얼 처럼 asset과 composition을 만든다.
- asset은 주어지는 비디오에 대한 정보를 담는다.
- composition에는 overlaid video 를 담을 것이다.
guard
  let compositionTrack = composition.addMutableTrack(
    withMediaType: .video, preferredTrackID: kCMPersistentTrackID_Invalid),
  let assetTrack = asset.tracks(withMediaType: .video).first
  else {
    print("Something is wrong with the asset.")
    onComplete(nil)
    return
}
- addMutableTrack 을 통해 .video 미디어 타입을 트랙에 추가한다.
- TrackID는 따로 사용하지 않을 경우 invalid 한 ID 상수를 할당한다.
- composition track 과 assetTrack 을 세팅하지 못하면 nil을 리턴한다.
do {
  // 1
  let timeRange = CMTimeRange(start: .zero, duration: asset.duration)
  // 2
  try compositionTrack.insertTimeRange(timeRange, of: assetTrack, at: .zero)

  // 3
  if let audioAssetTrack = asset.tracks(withMediaType: .audio).first,
    let compositionAudioTrack = composition.addMutableTrack(
      withMediaType: .audio,
      preferredTrackID: kCMPersistentTrackID_Invalid) {
    try compositionAudioTrack.insertTimeRange(
      timeRange,
      of: audioAssetTrack,
      at: .zero)
  }
} catch {
  // 4
  print(error)
  onComplete(nil)
  return
}
- CMTimeRange를 통해 비디오 내부의 시간 범위를 설정한다.
- 지금의 경우 비디오 전체로 범위를 설정했다.
- timerange가 정해지면 Asset에 있는 비디오를 composition video track 에 추가한다.
- asset이 오디오 트랙을 포함할 경우 오디오 트랙 또한 비디오와 같이 추가한다.
- 만약 에러가 날 경우 completion handler 에 nil 이 리턴된다.
Setting up the Composition
composition의 orientation과 sizing을 추가해야 한다.
compositionTrack.preferredTransform = assetTrack.preferredTransform
let videoInfo = orientation(from: assetTrack.preferredTransform)

let videoSize: CGSize
if videoInfo.isPortrait {
  videoSize = CGSize(
    width: assetTrack.naturalSize.height,
    height: assetTrack.naturalSize.width)
} else {
  videoSize = assetTrack.naturalSize
}
- composition 과 asset의 transform 이 같도록 한다.
- orientation이라는 미리 작성된 함수를 통해 비디오의 orientation을 들고올 수 있다.
- orientation이 portrait 이라면 비디오 size를 체크할 때 width 와 height을 반대로 해야한다.
Core Animation
- background 와 overlay들은 CALayer가 담당한다.
- CALayer는 Core Animation 프레임워크의 주요 클래스 이다.
- CoreAnimation은 앱의 모든 뷰 뒤에서 컨텐츠의 drawing 과 animating을 담당한다.
- 이름에서 알 수 있듯이 layer 위 또는 아래에 다른 layer그릴 수 있고 때문에 비디오의 배경이나 overlay들을 추가하는 완벽한 방식이 될 수 있다.
- AVVideoCompositionCoreAnimationTool은 composition과 Core Animation을 잇는 다리 역할을 하며 CALayer가 적용된 Video Composition으로 새로운 비디오를 만들 수 있게 해준다.
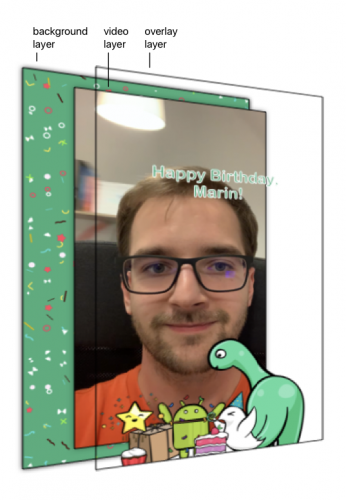
- 지금은 3개의 다른 레이어가 필요하다.
- 배경을 위한 레이어 (비디오 뒤)
- 비디오 프레임을 위한 레이어(비디오 자체)
- 비디오 위 레이어
케이크 레이어 추가하기
let backgroundLayer = CALayer()
backgroundLayer.frame = CGRect(origin: .zero, size: videoSize)
let videoLayer = CALayer()
videoLayer.frame = CGRect(origin: .zero, size: videoSize)
let overlayLayer = CALayer()
overlayLayer.frame = CGRect(origin: .zero, size: videoSize)
- background, video, overlay 레이어 3개를 만들어 준다.
let outputLayer = CALayer()
outputLayer.frame = CGRect(origin: .zero, size: videoSize)
outputLayer.addSublayer(backgroundLayer)
outputLayer.addSublayer(videoLayer)
outputLayer.addSublayer(overlayLayer)
- 3개의 레이어를 하나의 parent layer로 합쳐준다. (output layer)
Video Export 하기
let videoComposition = AVMutableVideoComposition()
videoComposition.renderSize = videoSize
videoComposition.frameDuration = CMTime(value: 1, timescale: 30)
videoComposition.animationTool = AVVideoCompositionCoreAnimationTool(
  postProcessingAsVideoLayer: videoLayer,
  in: outputLayer)
- 먼저 AVMutableVideoComposition을 만들어 준다.
- 이전에 사용한 AVComposition은 비디오와 오디오등 여러 타입의 track 을 가질 수 있다.
- 반면에 이번에는 AVVideoComposition만 사용하여 video track 만 사용할 것이다.
- 다음 렌더링될 비디오 사이즈를 원본 비디오 사이즈와 동일하게 정한다.
- frameDuration은 frame 이 얼마나 지속될지 결정해준다.
- CMTime을 1값으로 정해주고 timescale 을 30으로 해줌으로써 frame duration은 1/30으로 설정했다.
-> 결국 1초에 30프레임 - 마지막으로 animation tool을 추가해 준다.
- 이 tool은 합쳐진 output layer와 비디오 layer를 가져와 비디오 track 을 비디오 layer 로 렌더링 한다.
let instruction = AVMutableVideoCompositionInstruction()
instruction.timeRange = CMTimeRange(
  start: .zero,
  duration: composition.duration)
videoComposition.instructions = [instruction]
let layerInstruction = compositionLayerInstruction(
  for: compositionTrack,
  assetTrack: assetTrack)
instruction.layerInstructions = [layerInstruction]- video composition은 instructions의 집합을 사용하여 어느시점에 어떤걸 비디오에 보여줄지 정한다.
- 지금의 경우는 합쳐진 비디오 전체 시점동안 하나의 instruction만 보여주면 된다.
- 그래서 instruction 의 시작과 끝을 .zero ~ composition전체시간 으로 했고 배열에 instruction 하나만 추가한 걸 볼 수 있다.
- 각각의 instruction은 각각 다른 video track 을 어떻게 layer 할지 판단하는 자신만의 layer instruction들을 가질 수 있다.
- compositionLayerInstruction 라고 튜토리얼에서 제공되는 함수를 사용한다. 이 함수는 정확한 instruction들을 반환한다.
- 반환되는 Instruction들은 원본 비디오의 사이즈와 orientation에 맞게 생성되는 비디오를 scale 하고 rotate 해준다,
- 이 compositionLayerInstruction 없이는 비디오가 portrait 이였는데 landscape 되고 막 화면이 늘어나고 이럴것이다.
(이전에 포스팅 제일 끝에서 안한부분) - 이제 원본 비디오 + 원본 오디오 + 비디오 안에 케이크 레이어 렌더링하는 video composition을 가지고 있는 새로운 composition이 완성되었다. 이제 이것들을 합쳐서 export 해야된다.
guard let export = AVAssetExportSession(
  asset: composition,
  presetName: AVAssetExportPresetHighestQuality)
  else {
    print("Cannot create export session.")
    onComplete(nil)
    return
}
- AVAssetExportSession을 통해 export 세션을 생성한다.
- preset 에는 최고품질로 설정해준다.
let videoName = UUID().uuidString
let exportURL = URL(fileURLWithPath: NSTemporaryDirectory())
  .appendingPathComponent(videoName)
  .appendingPathExtension("mov")

export.videoComposition = videoComposition
export.outputFileType = .mov
export.outputURL = exportURL
- 파일 경로를 설정하여 export 세팅을 끝내준다.
- UUID를 사용하여 unique random string으로 파일 이름을 만들어 준다.
- 파일을 임시 디렉토리에 저장해두고 나중에 사용자가 어디 저장할지 선택하게 한다
- export session이 저장될 파일의 URL과 extionsion을 알려주고 비디오 렌더링을 하기위해 이전에 만든 composition을 제공한다.
export.exportAsynchronously {
  DispatchQueue.main.async {
    switch export.status {
    case .completed:
      onComplete(exportURL)
    default:
      print("Something went wrong during export.")
      print(export.error ?? "unknown error")
      onComplete(nil)
      break
    }
  }
}
- export session에 필요한 세팅이 완료되면 exportAsynchronously 를 통해 export 를 시작한다.
- export 는 completion handler를 통해 백그라운드 thread 에서 작업될 것이다.
- 메인 thread에서 작업을 한 뒤 result를 확인해야 한다.
- 만약 성공했다면 exported 된 파일의 URL이 핸들러를 통해 넘어오고 실패했을 경우 에러와 함께 nil을 반환한다.
배경 레이어 추가
- 현재는 비디오가 배경만큼 사이즈가 커서 배경이 보여지지 않는다. 비디오를 crop 해서 뒷 배경이 보이게 하면 border 처럼 적용될 수 있다.
- 이전에 레이어 부분에 각각의 코드를 추가한다.
backgroundLayer.backgroundColor = UIColor(named: "rw-green")?.cgColor
videoLayer.frame = CGRect(
  x: 20,
  y: 20,
  width: videoSize.width - 40,
  height: videoSize.height - 40)
- 먼저 배경 레이어 부터 추가하고
- 40만큼 비디오 레이어를 crop 한다.
backgroundLayer.contents = UIImage(named: "background")?.cgImage
backgroundLayer.contentsGravity = .resizeAspectFill
- backgroundlayer 에 배경 이미지를 추가시킨다.
- Core Animation과 함꼐 이미지를 보여주고 싶다면 CALayer의 contents를 image로 설정해야 한다.
- contentsGravity 를 resizeAspectFill로 설정하여 항상 이미지가 비율을 유지하며 레이어에 꽉 차게 보이도록 설정한다.
이미지 레이어 추가
static func addImage(to layer: CALayer, videoSize: CGSize) {
        let image = UIImage(named: "overlay")!
        let imageLayer = CALayer()

        let aspect: CGFloat = image.size.width / image.size.height
        let width = videoSize.width
        let height = width / aspect
        imageLayer.frame = CGRect(
            x: 0,
            y: -height * 0.15,
            width: width,
            height: height)

        imageLayer.contents = image.cgImage
        layer.addSublayer(imageLayer)
    }
- 배경 레이어와 비슷하게 이미지를 imageLayer에 넣어준다.
- 이미지의 비율을 계산하여 이미지가 깨지지않고 보이게 하고 화면의 위치도 잡아준다.
- addImage 를 이용하여 layer 에 이미지를 추가해준다.
텍스트 추가
private func add(text: String, to layer: CALayer, videoSize: CGSize) {

let attributedText = NSAttributedString(
  string: text,
  attributes: [
    .font: UIFont(name: "ArialRoundedMTBold", size: 60) as Any,
    .foregroundColor: UIColor(named: "rw-green")!,
    .strokeColor: UIColor.white,
    .strokeWidth: -3])

let textLayer = CATextLayer()
textLayer.string = attributedText
textLayer.shouldRasterize = true
textLayer.rasterizationScale = UIScreen.main.scale
textLayer.backgroundColor = UIColor.clear.cgColor
textLayer.alignmentMode = .center

textLayer.frame = CGRect(
  x: 0,
  y: videoSize.height * 0.66,
  width: videoSize.width,
  height: 150)
textLayer.displayIfNeeded()
layer.addSublayer(textLayer)

}

add(
  text: "Happy Birthday,\n\(name)",
  to: overlayLayer,
  videoSize: videoSize)
- 배경과 이미지를 넣은 방법과 동일하게
- attributedText를 먼저 만들고
- 텍스트 레이어를 만든 뒤 레이어에 대한 속성을 정해주고
- 레이어의 frame으로 위치를 정해준 뒤
- add함수를 통해 텍스트와 그려질 CALayer, 그리고 사이즈를 넘겨준다.
완성
전체코드
https://github.com/KimTaeHyeong17/Dreamin_iOS_2020
KimTaeHyeong17/Dreamin_iOS_2020
한화 드림인 아카데미 레포. Contribute to KimTaeHyeong17/Dreamin_iOS_2020 development by creating an account on GitHub.
github.com
참고 튜토리얼
AVFoundation Tutorial: Adding Overlays and Animations to Videos
In this AVFoundation tutorial, you’ll learn how to add overlays and animations to videos, by using the AVVideoComposition CoreAnimationTool, which allows you to combine CALayers with videos to add backgrounds and overlays.
www.raywenderlich.com
How to Play, Record and Merge Videos in iOS and Swift
Learn the basics of working with videos on iOS with AV Foundation in this tutorial. You’ll play, record and even do some light video editing!
www.raywenderlich.com
구현한 기능
- 비디오를 불러오기
- 비디오 촬영해서 저장하고 불러오기
- 비디오 재생하기
- 비디오 두개랑 오디오 합치기
- 비디오에 배경 레이어와 이미지 레이어 등을 합쳐서 export 하기
앞으로 구현해볼 기능
- 애플 펜슬로 레이어에 drawing 하기
- 애플 펜슬로 drawing 한 레이어를 영상과 합쳐서 export
- 애플 펜슬로 그리면서 do/undo 기능 구현해보기 (펜슬킷에 없으려나)
- 영상 frame별로 작업할 수 있도록 타임라인 만들어서 탐색가능하게 하기
- 영상 작업 도중 나가면 그 상태로 저장되 있도록 하는 기능 (메멘토 패턴 참고)
'iOS' 카테고리의 다른 글
| [환경세팅] 예전 버전 cocoapods 설치 (1.9.1) (0) | 2021.03.31 |
|---|---|
| Github을 이용한 iOS 개발 협업 기초 (PR,코드리뷰,Merge) (10) | 2020.09.09 |
| 🎥 iOS 비디오 재생, 녹화, 병합 튜토리얼 (2) (0) | 2020.09.01 |
| 🎥 iOS 비디오 재생, 녹화, 병합 튜토리얼 (1) (0) | 2020.08.31 |
| iOS 영상편집 앱 개발을 위한 레퍼런스 모음 (0) | 2020.08.30 |


댓글